Mandala-Inspired Rock Painting: Build Your Own Pattern
Design your own radial pattern of dots and petal shapes, then paint it ring by ring on a dark stone using eight simple guide lines.

Tutorial at a glance
Materials
- Acrylic craft paint: black for the base
- Acrylic craft paint: white, teal, coral, yellow
- Flat brush for the base coat
- Dotting tools in three sizes, or household substitutes
- Small round brush or fine detail brush
- White chalk pencil or sharpened chalk
- Ruler
- Paper and pencil for planning
- Damp cotton swabs and paper towel
- Clear sealer, brush-on or spray (optional)
On this site, “mandala-inspired” means one specific thing: an original radial pattern of dots and simple shapes, repeated evenly around a center point. It is a decorative design exercise that you plan yourself. Nothing here is a copy of a traditional or sacred design, and no meaning is attached to the pattern beyond how it looks.
The appeal is in the structure. A few faint guide lines divide the stone into equal slices, and every shape you add is repeated in each slice. Symmetry does the rest.
What you need
- A round, smooth, fairly flat stone about 3 in (8 cm) across. A larger stone gives beginners more room for rings.
- Acrylic craft paint: black for the base, plus white, teal, coral and yellow.
- Dotting tools in at least three sizes, or substitutes such as a brush handle and a toothpick.
- A small round brush or fine detail brush for petal shapes.
- A white chalk pencil or a piece of sharpened chalk, a ruler, and a damp cotton swab.
- Paper and a pencil for planning.
If you have never made dots with a tool before, spend ten minutes with dot painting on rocks first. Paint thickness and the straight-down, straight-up motion matter more here than anything else.
Design your pattern on paper
Trace around your stone on paper so the plan is the same size as the real thing. Mark the center, then draw four straight lines through it to make eight equal slices, like a pizza. Eight is the easiest number to work with because you get it simply by halving the circle three times.
Now decide what goes in each ring, moving outward. You have a small set of building blocks to choose from:
| Element | How to make it | Where it works best |
|---|---|---|
| Large dot | Biggest dotting tool, reloaded for every dot | The center and the outer rings |
| Small dot | Fine stylus or toothpick | Inner rings and gap fillers |
| Walked dots | Dip once, make several dots that shrink | Curved trails around a larger dot |
| Petal | Press a small round brush down and pull to a point | Middle rings, one per slice |
| Swooshed dot | Place a dot, then drag a toothpick through it toward the center | Teardrop shapes between petals |
Sketch four to six rings, alternating dots with petal shapes, and write a color next to each. Limit yourself to three colors plus white. Repeating one color in the center and again in the outermost ring ties the design together. For help choosing a warm, cool or mixed set, see color planning for rock painting.
Paint the pattern step by step
- Paint the base coat. Cover the top and sides of the clean, dry stone with black acrylic paint. Use two thin coats and let the second dry completely. A dark, matte, even base is what makes the colors stand out.
- Draw the guide lines. Mark the center of the stone with the chalk pencil. Lay the ruler across it and draw a faint line from edge to edge, then a second line at a right angle to make a cross. Add two diagonal lines to split each quarter in half. You now have eight slices. Keep the lines light, since they will be wiped away later.
- Place the center dot. Dip your largest tool in white and press it exactly where the lines cross. Lift straight up. Let it set for a minute before working next to it.
- Dot the first ring. With a small tool and yellow paint, place one dot on each of the eight guide lines, just outside the center dot. Then add one dot between each pair, for sixteen small dots in all.
- Dot the second ring. With a medium tool and teal, place one dot on each guide line, a little farther out. Eight dots, each sitting directly on a line, set the rhythm for everything that follows. Stop here and let these two rings dry for several minutes.
- Paint a ring of petals. Load the small round brush with coral. In each space between two guide lines, press the brush down near the outer edge of where the petal should be and pull toward the center, lifting to a point. That gives eight petals, each centered in a slice. Turn the stone after every petal so the stroke is always pulled toward you.
- Add a ring of larger dots. With your largest tool and white, place a dot on each guide line beyond the petal tips. These sit between the petals, like the stagger of bricks in a wall.
- Frame with walked dots. Dip a small tool in yellow once and walk three or four shrinking dots up one side of a large white dot. Reload and mirror them on the other side. Repeat around the stone.
- Finish the edge. Add a final ring of medium teal dots near the rim, letting them wrap slightly over the side. Tuck tiny white dots into any gaps that look empty.
- Add top dots. When the large dots are dry to the touch, place a smaller dot of a contrasting color in the center of each one.
- Remove the guide lines. Wait until every dot is fully dry. Then wipe away the visible chalk with a barely damp cotton swab, working between the shapes, not across them.

Watch out
Test your chalk or pencil on the back of the stone before drawing guide lines on the front. Some marks do not wipe off dried paint cleanly. Graphite in particular can show through light colors, so use chalk on dark base coats.
Keeping the symmetry
- Finish each ring before starting the next. Skipping ahead in one slice makes it hard to match the others.
- Use the same tool for the whole ring. Changing tools partway produces dots of different sizes that the eye picks up immediately.
- Look straight down. Viewing the stone at an angle distorts the spacing. Check it from directly above every ring or two.
- Repeat a mistake instead of hiding it. If one dot lands slightly off, a matching offset in the opposite slice often looks intentional.
For a dot that is plainly wrong, lift it while wet with the corner of a damp cotton swab, or let it dry, cover it with black and try again.
Changing the palette
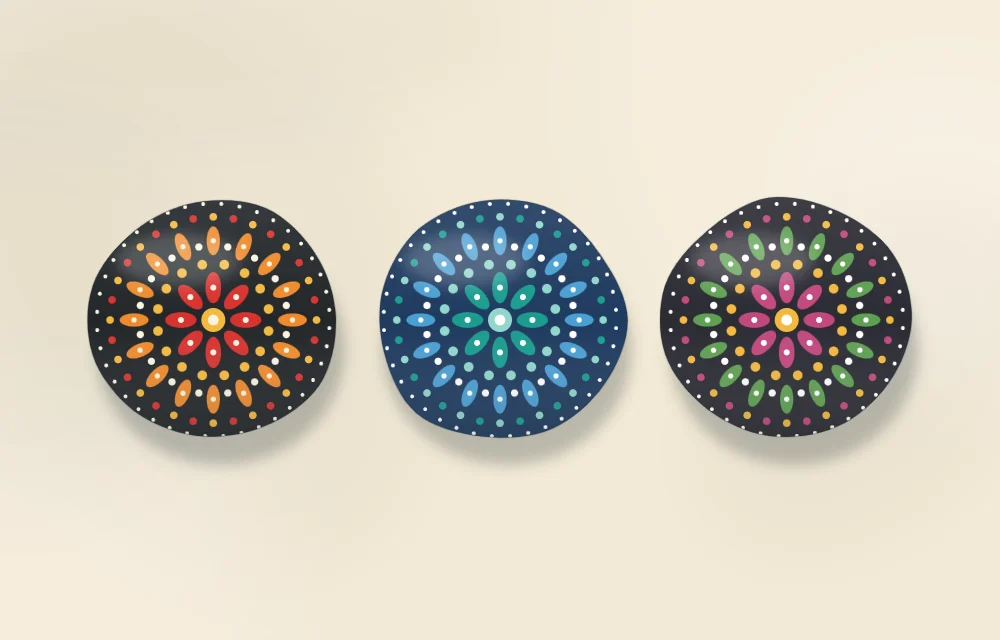
The same layout looks very different in new colors. Try a warm set of yellow, orange and red; a cool set of teal, blue and violet; or a rainbow in which each ring moves one step around the color wheel. Keeping white for the center dot and a few accents gives every version the same crisp contrast.
Drying, sealing and display
Raised dots stay soft inside long after the surface feels dry, so leave the stone flat and untouched for as long as the paint label recommends. A clear brush-on or spray sealer can help protect the raised paint from knocks. Follow the manufacturer’s instructions for coats, curing and ventilation, and leave spray products to an adult. The steps are set out in how to dry and seal painted rocks.
Finished stones look good grouped in a bowl or on a tray, and decorative painted stones for the home has more display ideas. They are ornaments, not toys, so keep them out of reach of small children.
Frequently asked questions
What does mandala-inspired mean here?
It means an original radial pattern of dots and simple shapes repeated evenly around a center point. It is a decorative design that you plan yourself, not a copy of a traditional or sacred design.
How do I keep the pattern symmetrical?
Draw faint chalk guide lines that divide the stone into eight equal slices and place the first dots of each ring on those lines. Finish every ring completely before starting the next, and check the stone from directly above.
Do I need special tools for a radial pattern?
Dotting tools make even dots easier, but a brush handle, a cotton swab stick and a toothpick can cover three sizes. A small round brush handles the petal shapes.