Best Brushes for Rock Painting and What Each One Does
The four brush shapes that cover almost every painted rock, what mark each one makes, how to load them with paint and how to clean them so they keep their shape.
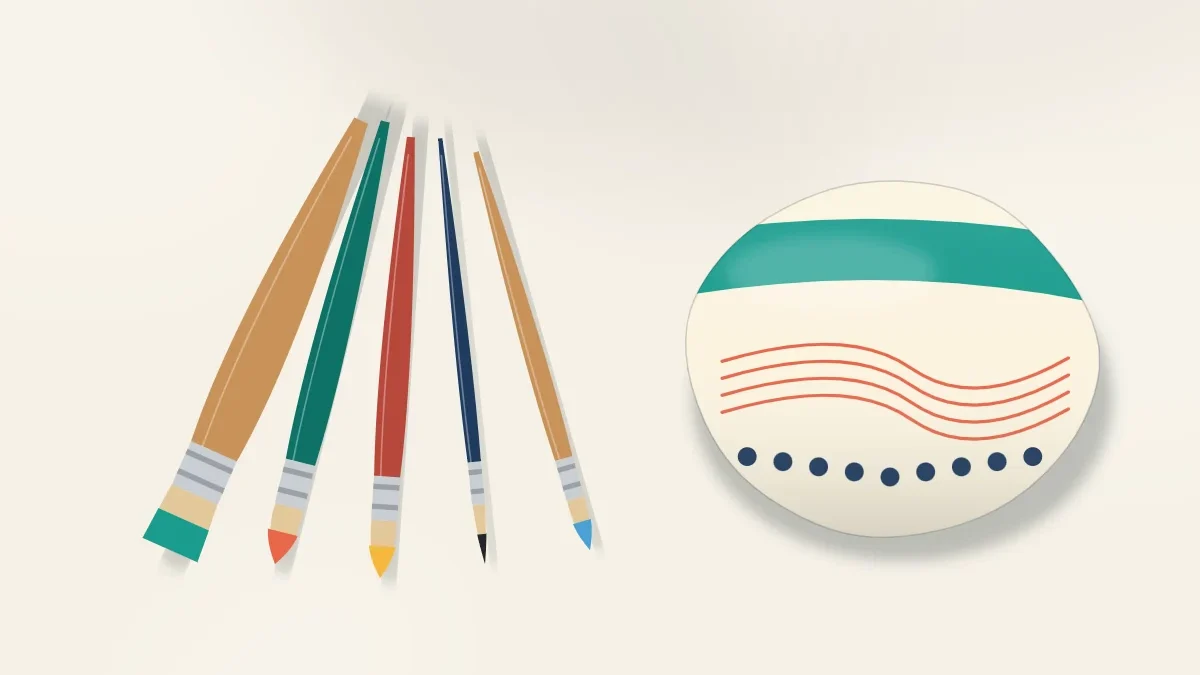
Four brush shapes do nearly all the work in rock painting: a flat, a round, a liner and a small detail brush. Each one makes a particular kind of mark, and using the wrong one is a common reason a stone looks streaky or a line turns out thicker than planned.
Knowing what each brush is built to do makes the choice at the table quick, and it means a starter set can be small.
Brush shapes compared
| Brush | Useful sizes | Mark it makes | Use it for |
|---|---|---|---|
| Flat | 1/4 to 3/4 in (6 to 20 mm) | Wide, even band with square edges | Base coats, backgrounds, sky bands, stripes |
| Round | Sizes 2 to 6 | Stroke that swells and tapers with pressure | Petals, leaves, bodies, filling shapes |
| Liner | Sizes 0 to 1 | Long, thin line of even width | Outlines, stems, veins, whiskers |
| Detail (short round) | Sizes 0 to 3/0 | Tiny dots and short, precise strokes | Eyes, highlights, seeds, small corrections |
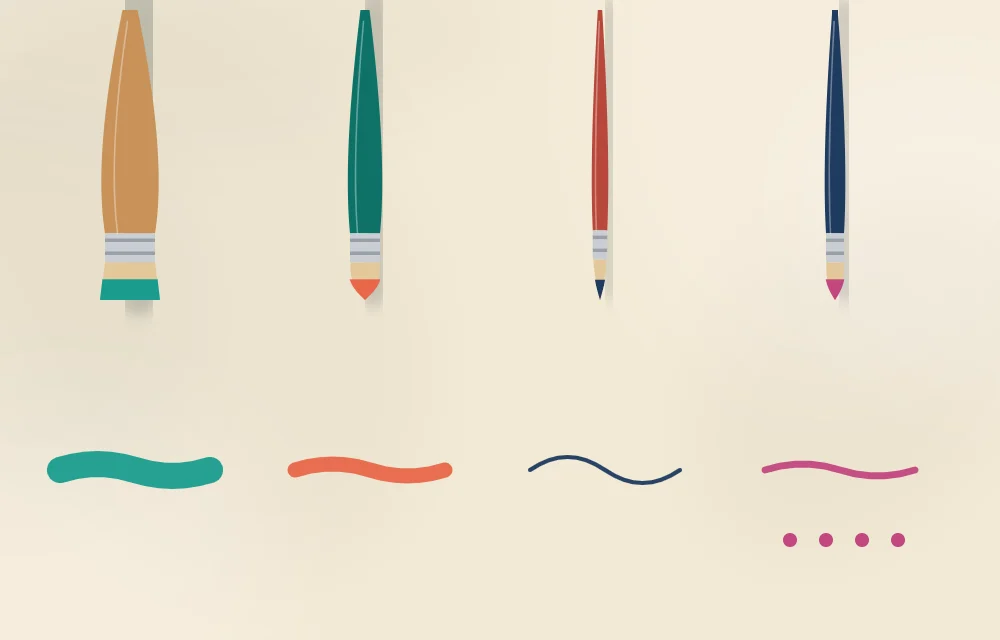
Flat brush: coverage
A flat brush has a wide, squared-off tip. It carries a lot of paint and lays it down in broad, even bands, which makes it the right tool for base coats and backgrounds. Trying to cover a whole stone with a small round brush takes many more strokes, and every extra stroke is a chance to leave a streak.
Hold the flat brush at a low angle and pull it in long, overlapping strokes in one direction. For the second coat, brush across the first. A flat about 1/2 in (12 mm) wide suits stones of 2 to 3 in (5 to 8 cm). Turned on its thin edge, the same brush makes a straight, narrow line, which is handy for stripes.
Round brush: shapes
A round brush has a full belly that comes to a point. Light pressure gives a thin mark from the tip; pressing down spreads the bristles and widens the stroke. That change in width is what forms a petal or a leaf in one movement: touch the tip down, press, pull and lift.
A size 4 handles most shapes on a medium stone, and a size 2 fits smaller areas. This press-and-lift stroke is the basis of the petals in how to paint flowers on rocks and of most leaf shapes, so it is worth practicing on scrap paper first.
Liner brush: long thin lines
A liner has long, thin bristles. The length matters: long bristles hold more paint than a short detail brush of the same width, so one load can carry a line right around a shape without running dry halfway.
Liners need thinner paint than other brushes. Mix a drop of water into the paint until it flows like ink, load the brush, then roll the tip on the palette to bring it to a point. Rest the heel of the hand on the table and pull the brush toward you, turning the stone rather than the wrist. Step-by-step line technique is covered in how to outline painted rocks.
Detail brush: the smallest marks
A detail brush is a very small round with short bristles. Short bristles do not flex much, which gives close control for marks such as the white highlight in an eye, strawberry seeds or the tip of a petal. It holds very little paint, so it needs reloading often and is the wrong tool for anything longer than a short dash.
What to look for when buying
- Synthetic bristles. Stone is slightly abrasive, and synthetic fibers stand up to it better than soft natural hair. They also spring back to shape, which helps with control.
- A tip that holds its shape. Wet the brush and flick it gently. A round or liner should return to a clean point; a flat should keep a straight, even edge with no stray hairs.
- A firm ferrule. The metal collar should not wobble on the handle. A loose ferrule makes precise marks very difficult.
- Short handles. Rock painting is close work at a table, and short handles are easier to manage than long easel-style ones.
A mixed pack of synthetic craft brushes usually includes all four shapes. The cheapest packs tend to shed bristles into wet paint, so it is worth choosing a mid-priced set and looking after it. Where brushes sit among the other tools is covered in the guide to rock painting supplies.
Loading the brush properly
How much paint is on the brush matters as much as which brush it is.
- Dampen the brush and blot it on a cloth before the first dip. Damp bristles take up paint more evenly than dry ones.
- Dip only the lower half of the bristles. Paint that reaches the ferrule is hard to wash out and gradually forces the bristles apart.
- Wipe one side of the brush on the edge of the palette. A brush that is dripping leaves blobs at the start of every stroke.
- Reload before the brush runs dry. A dry brush scrapes and leaves a scratchy, broken mark.
Tip
Before touching the stone, make one test stroke on scrap paper. It shows right away whether the paint is too thick, too watery or overloaded, and it removes the blob that often sits on a freshly loaded tip.
Cleaning and care
Acrylic paint that dries in a brush ruins it, so cleaning has to happen during the session, not after.
- Rinse between colors. Swish the brush in water and blot it on a cloth until no color comes off.
- Do not leave brushes standing in the jar. Resting on the tip bends the bristles for good, and long soaking loosens the glue that holds them.
- Wash with mild soap at the end. Work a little soap into the bristles with your fingers, rinsing until the water runs clear, especially near the ferrule.
- Reshape and dry flat. Smooth the tip back to a point or a straight edge and lay the brush on its side to dry, then store it upright with the bristles up.
Watch out
Keep one older brush just for sealer and never use it for paint. Follow the cleanup instructions on the sealer label, because some products do not rinse out with plain water.
When a brush is not the best tool
Perfectly round dots are easier with a dotting tool or the handle end of a brush than with bristles, and many painters prefer an acrylic paint pen for lettering. Brushes still do the base coats, backgrounds and filled shapes that those tools cannot. Problems such as streaks and wobbly lines often trace back to brush choice or loading, and the list of common rock painting mistakes explains how to fix them.
Frequently asked questions
What brushes do I need for rock painting?
A flat brush about 1/2 inch wide for base coats, a round brush around size 4 for shapes and a liner or small detail brush for thin lines cover most designs. Synthetic bristles hold up better on stone than soft natural hair.
Why do my brush strokes look streaky on rocks?
Streaks usually come from a brush that is too small for the area, paint that is too thick or a brush that is running dry. Use a flat brush, thin the paint slightly and apply two thin coats, brushing the second across the first.
How do I clean acrylic paint out of brushes?
Rinse the brush in water between colors and wash it with mild soap at the end of the session, before the paint dries. Reshape the tip, dry the brush flat and check the paint label for any specific cleanup instructions.